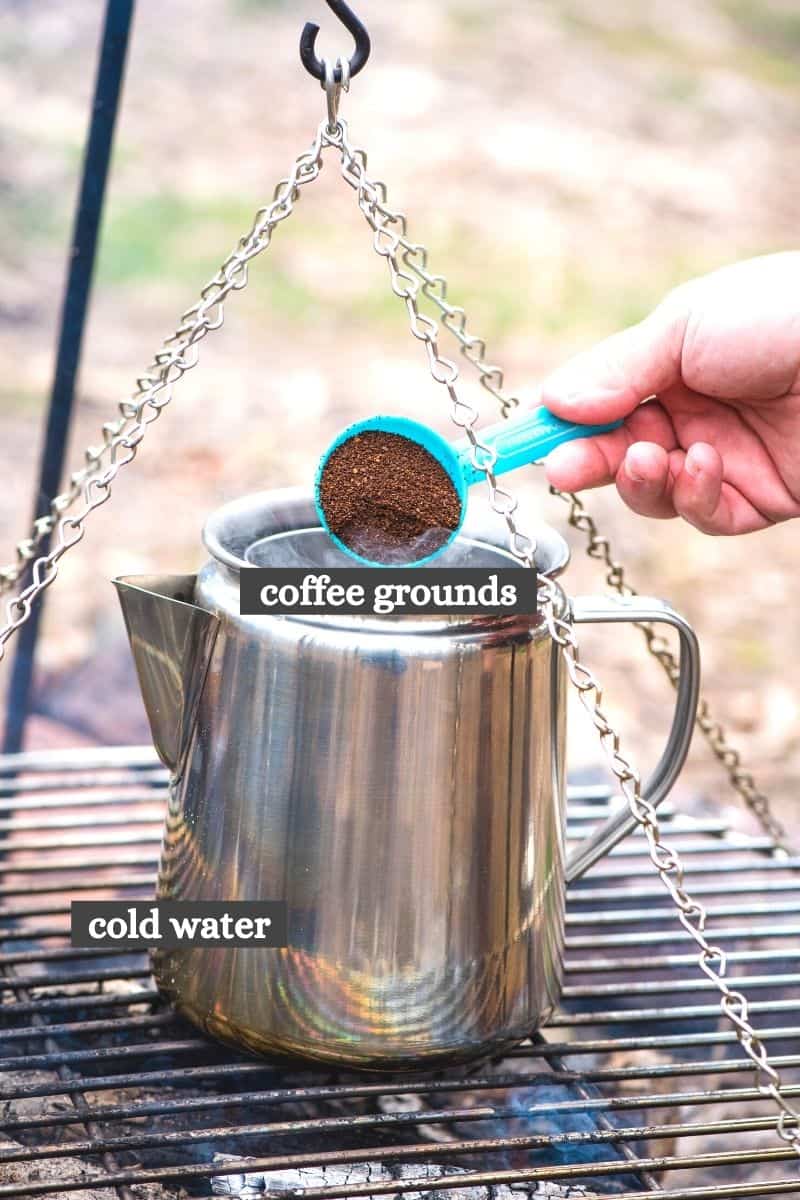
Can I make coffee with a percolator while camping? Yes, you can! A percolator is a fantastic way to brew coffee while camping, offering a robust and flavorful cup with minimal fuss. This camping coffee percolator guide will give you the best percolator coffee camping tips to enjoy great coffee in the great outdoors.

Image Source: adventuresofmel.com
Percolator Coffee Outdoors: A Timeless Tradition
For decades, the percolator has been a trusted method for brewing coffee outdoors. Its simplicity, durability, and ability to deliver a strong, satisfying brew make it an ideal choice for percolator coffee outdoors. The aroma of campfire coffee percolator method coffee brewing over an open flame is a quintessential camping experience.
Why Choose a Percolator for Camping?
- Durability: Percolators are typically made of stainless steel or enamelware, making them incredibly durable and able to withstand the rigors of camping.
- Simplicity: They have few moving parts, so there’s less to break or go wrong in the wilderness.
- No Filters Needed: Most percolators don’t require paper filters, reducing waste and simplifying cleanup.
- Campfire Friendly: Designed to sit directly over a campfire or camp stove, they’re perfectly suited for outdoor brewing.
- Rich Flavor: Percolators tend to produce a bold, rich flavor that many coffee lovers enjoy.
Selecting the Right Camping Percolator
Choosing the right portable coffee percolator for camping depends on your needs and preferences. Consider these factors:
Size and Capacity
How many people will you be brewing for? Percolators come in various sizes, from small 4-cup models to larger 12-cup versions. Choose a size that matches your typical group size to avoid waste or having to brew multiple batches.
Material
- Stainless Steel: Durable, rust-resistant, and easy to clean. A popular choice for camping.
- Enamelware: Offers a classic look and is relatively durable, but can chip if mishandled.
Features
- Glass Knob: Allows you to monitor the brewing process.
- Wide Base: Provides stability on uneven surfaces.
- Bail Handle: Makes it easy to hang the percolator over a campfire.
- Perforations: Ensure the holes are large enough to not clog easily.
Here’s a comparison table to help you decide:
| Feature | Stainless Steel | Enamelware |
|---|---|---|
| Durability | Excellent | Good (can chip) |
| Rust Resistance | Excellent | Good (can rust if chipped) |
| Cleaning | Easy | Easy |
| Style | Modern, functional | Classic, rustic |
| Heat Retention | Good | Good |
| Price | Typically slightly more expensive | Can be more affordable |
Getting Started: Percolator Coffee Camping Equipment
Before you head out on your camping trip, make sure you have all the necessary equipment:
- Percolator: Choose one that suits your needs (size, material, features).
- Coffee: Opt for a coarsely ground coffee that is the best coffee for camping percolator.
- Heat Source: Campfire, portable camp stove, or backpacking stove.
- Water: Clean, potable water for brewing.
- Measuring Cup/Spoon: To accurately measure coffee and water.
- Mug: For enjoying your freshly brewed coffee.
- Oven Mitt or Potholder: To handle the hot percolator.
- Towel: For cleaning up spills.
- Grinder (Optional): If you prefer to grind your beans fresh.
- Thermometer (Optional): To monitor water temperature (for advanced brewers).
Percolator Coffee Camping Brewing Instructions: A Step-by-Step Guide
Follow these camping percolator brewing instructions to make delicious coffee while camping:
Step 1: Gather Your Supplies
Ensure you have all your equipment and ingredients readily available. This will streamline the brewing process and prevent any mid-brew fumbles.
Step 2: Measure Water
Fill the percolator with the desired amount of water. A general guideline is 6 ounces of water per cup of coffee. Pay attention to the fill line inside the percolator if it has one.
Step 3: Add Coffee Grounds
Place the coffee grounds in the basket of the percolator. A good starting point is 2 tablespoons of coarsely ground coffee per 6 ounces of water, but adjust to your taste. For a stronger brew, use more coffee; for a weaker brew, use less.
Step 4: Assemble the Percolator
Place the basket on top of the percolator tube, ensuring it sits securely. Then, place the lid on top of the percolator.
Step 5: Heat the Percolator
Place the percolator over your heat source. If using a campfire, position it carefully over the embers, ensuring it is stable. If using a camp stove, set the burner to medium heat.
Step 6: Monitor the Brewing Process
Watch the glass knob on top of the percolator. Once the water starts to percolate (bubble up through the tube and into the glass knob), reduce the heat slightly. You should see the coffee cycling through the knob.
Step 7: Percolate for the Right Amount of Time
Allow the coffee to percolate for 7-10 minutes. The longer it percolates, the stronger the coffee will be. Be careful not to over-percolate, as this can make the coffee bitter.
Step 8: Remove From Heat
Once the coffee has brewed to your desired strength, remove the percolator from the heat source. Use an oven mitt or potholder to protect your hands.
Step 9: Let it Settle
Allow the coffee to sit for a minute or two to allow any remaining grounds to settle at the bottom of the percolator.
Step 10: Pour and Enjoy
Carefully pour the coffee into your mug, avoiding any grounds that may have settled at the bottom. Add sugar, milk, or cream to taste, and enjoy your freshly brewed campfire coffee percolator method coffee!
Mastering the Campfire Coffee Percolator Method
Brewing with a percolator over a campfire requires a bit of finesse. Here are some tips for success:
- Use Coarse Grounds: Coarsely ground coffee is crucial for percolators. Finer grounds can clog the basket and lead to bitter coffee.
- Control the Heat: Campfires can be unpredictable. Try to create a bed of hot embers rather than using a large, roaring flame. This will help prevent the coffee from overheating and becoming bitter.
- Stable Placement: Make sure the percolator is stable on the campfire. Use rocks or other supports to create a level surface.
- Wind Protection: Wind can affect the brewing process. Try to shield the percolator from strong winds to ensure even heating.
Percolator Coffee Camping Tips for Perfecting Your Brew
- Start with Cold Water: Always use cold, fresh water for the best flavor.
- Pre-Heat the Water (Optional): If you want to speed up the brewing process, you can pre-heat the water in a separate pot before adding it to the percolator.
- Experiment with Brew Time: The ideal brewing time will vary depending on your percolator and your personal taste. Start with 7 minutes and adjust from there.
- Use a Heat Diffuser: If you’re using a camp stove, a heat diffuser can help distribute the heat more evenly and prevent scorching.
- Clean Your Percolator Regularly: A clean percolator will produce better-tasting coffee and last longer. Wash it thoroughly after each use.
- Store Coffee Properly: Keep your coffee beans or grounds in an airtight container to maintain freshness.
Camping Percolator Coffee Troubleshooting: Common Issues and Solutions
Even with careful preparation, you might encounter some challenges. Here’s how to address them:
| Issue | Possible Cause | Solution |
|---|---|---|
| Bitter Coffee | Over-percolation, fine grounds, too much coffee | Reduce brewing time, use coarser grounds, use less coffee |
| Weak Coffee | Under-percolation, not enough coffee | Increase brewing time, use more coffee |
| Coffee Grounds in Cup | Fine grounds, basket not seated properly | Use coarser grounds, ensure basket is seated correctly, let grounds settle |
| Percolator Not Bubbling | Not enough heat, clogged tube | Increase heat, check for and clear any clogs in the tube |
| Coffee Boiling Over | Too much heat | Reduce heat |
Maintaining Your Camping Percolator
Proper maintenance will extend the life of your percolator and ensure consistently delicious coffee.
- Cleaning After Each Use: Wash the percolator with soap and hot water after each use. Be sure to disassemble the percolator and clean all parts, including the basket and tube.
- Descaling: Periodically descale your percolator to remove mineral buildup. You can use a commercial descaler or a mixture of vinegar and water.
- Storage: Store the percolator in a dry place to prevent rust or corrosion.
Beyond the Basics: Advanced Percolator Techniques
Once you’ve mastered the basics, you can experiment with advanced techniques to further refine your percolator coffee outdoors.
- Cold Brew Percolator: Use a percolator to make cold brew concentrate. Add coarse grounds to the basket and fill the percolator with cold water. Let it steep in the refrigerator for 12-24 hours, then remove the basket and enjoy the cold brew concentrate.
- Infused Coffee: Add spices like cinnamon, nutmeg, or cardamom to the coffee grounds for a unique flavor.
- Adjust Grind Size: Different beans and roasts might benefit from slight adjustments to grind size. Experiment to find the perfect grind for your taste.
FAQ: Frequently Asked Questions
- What is the best coffee grind for a camping percolator?
- Coarsely ground coffee is best. Finer grinds can clog the percolator and result in bitter coffee.
- Can I use a percolator on a gas stove?
- Yes, you can. Use a medium heat setting and a heat diffuser to prevent scorching.
- How long should I percolate coffee?
- 7-10 minutes is generally recommended, but adjust to your taste.
- How do I clean a camping percolator?
- Wash with soap and hot water after each use. Disassemble and clean all parts.
- Can I use a percolator to make tea?
- While possible, it’s not recommended. The coffee residue can affect the taste of the tea.
- What are the downsides of using a percolator?
- Percolators can be prone to over-extraction, leading to bitter coffee if not carefully monitored. It also requires more cleaning compared to other simpler methods like instant coffee.
- How do I make coffee in a percolator without making it bitter?
- Use coarse ground coffee, watch the brewing time carefully (aim for 7-10 minutes), avoid high heat, and clean your percolator regularly.
- Are percolators better than drip coffee?
- It depends on personal preference. Percolators produce a bolder, richer flavor, while drip coffee is often cleaner and more nuanced.
- Can I use pre-ground coffee in a percolator?
- Yes, but it’s best to use coarsely ground coffee. If you’re using pre-ground coffee, look for a grind size labeled “coarse” or “French press.”
- What safety measures should I take while camping with a percolator?
- Always use oven mitts or potholders to handle the hot percolator. Ensure the percolator is stable on the heat source to prevent spills. Never leave a percolator unattended over a campfire.
With these tips and tricks, you’ll be brewing delicious percolator coffee outdoors like a pro in no time. Enjoy your next camping trip, and happy brewing!

Melody Smith is a passionate writer, outdoor enthusiast, and camping expert based in the Seattle Metropolitan Area. With a deep love for nature and adventure, she shares her personal experiences, tips, and insights on MyCampingPro.com. A seasoned camper and traveler, Melody combines her creative background in design and writing with her love for the great outdoors, offering practical advice and inspiring stories to help others make the most of their outdoor experiences. When she’s not exploring the wilderness, you can find her painting, collecting vintage treasures, or diving into a good book.
