How long should you percolate coffee when camping? Generally, you should percolate coffee for about 6-10 minutes when camping, depending on your preferred strength and the size of your percolator. This duration allows for a rich, flavorful brew without over-extraction. Read on to master the art of camping coffee percolation for that perfect cup in the great outdoors.

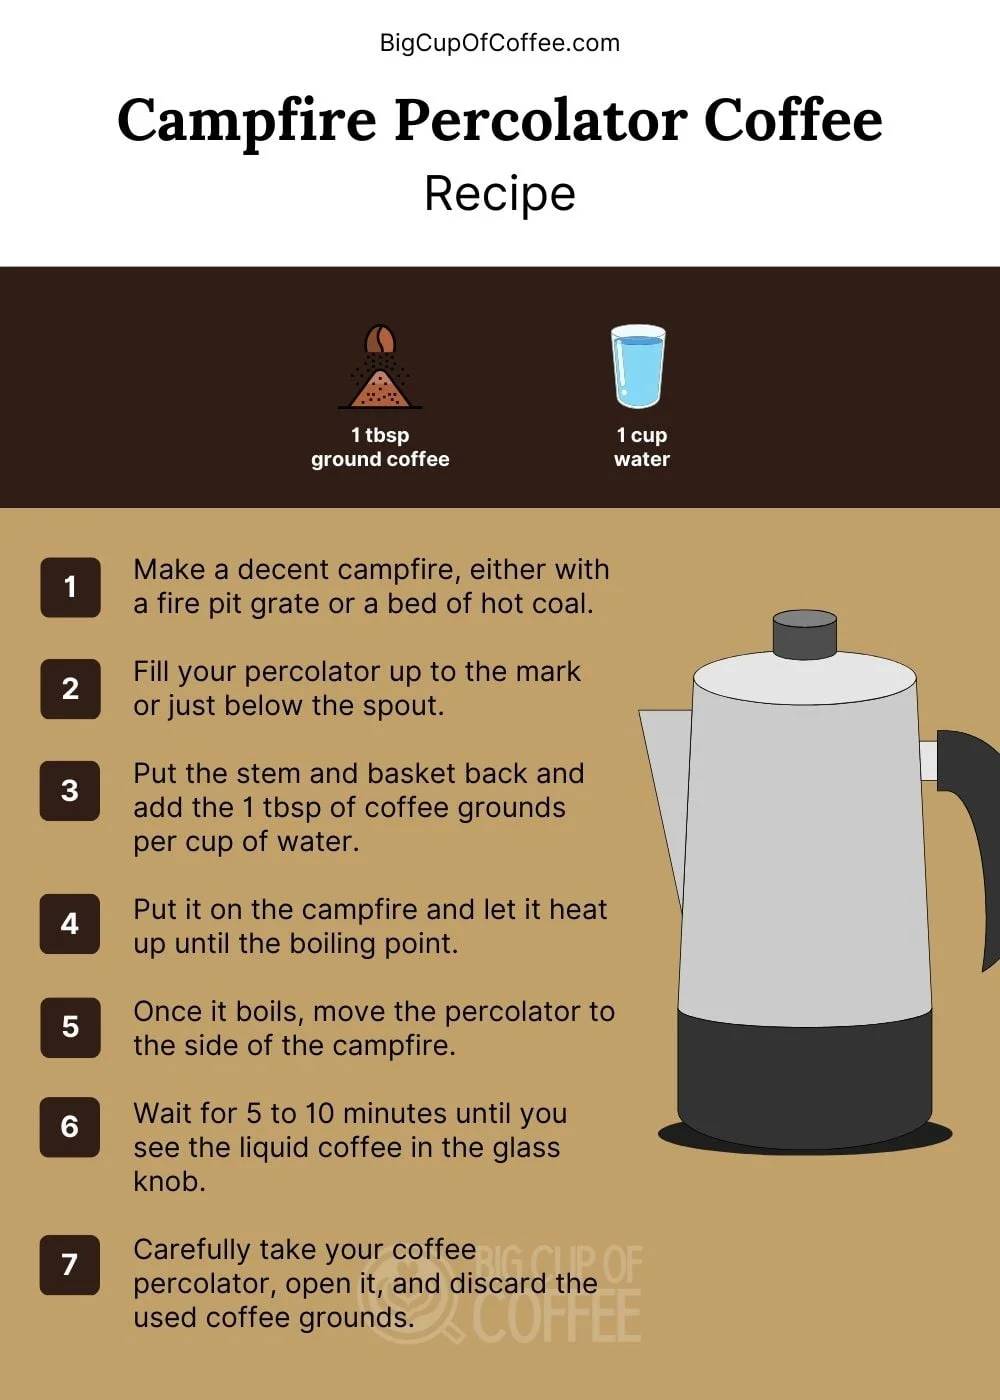
Image Source: bigcupofcoffee.com
Why Percolated Coffee is Great for Camping
Percolated coffee offers a unique, robust flavor loved by many outdoor enthusiasts. It’s a fantastic camping coffee brewing method, steeped in tradition. But what makes it so suitable for camping?
Simplicity and Durability
Percolators are simple devices, usually made of stainless steel or enamel-coated steel, making them durable enough to withstand the rigors of camping. They don’t require paper filters, reducing waste and simplifying the packing list.
Portability and Convenience
Most percolators are compact and easy to pack. They can be used directly on a campfire or camp stove, offering flexibility in your brewing location. This makes them ideal for those seeking a traditional camping coffee brewing method.
The Robust Flavor
The recirculation process of percolation extracts a strong, bold flavor profile. This is often preferred by those who enjoy a hearty cup of coffee in the morning to kickstart their day in the wilderness. The robust nature of percolated coffee perfectly complements the rugged outdoor setting.
The Science Behind Coffee Percolation
Percolation involves repeatedly cycling boiling water through coffee grounds. The water is heated in the bottom chamber, rises through a tube, and then showers over the grounds in the upper chamber. The brewed coffee then drips back down into the bottom chamber, ready to be enjoyed. But how does camping coffee percolation time affect the final brew?
Understanding the Extraction Process
The longer the percolation duration, the more coffee solids are extracted from the grounds. A short camping coffee percolation time might result in weak, under-extracted coffee. Conversely, an excessive percolator coffee camping duration can lead to bitter, over-extracted coffee. Striking the right balance is key to achieving that perfect cup.
Factors Influencing Percolation Time
Several factors can influence the ideal percolating coffee over campfire timing:
- Grind Size: A coarser grind is generally recommended for percolators. Too fine a grind can clog the filter and lead to over-extraction.
- Heat Source: The heat source directly impacts the brewing speed. A roaring campfire might shorten the duration, while a low camp stove setting will increase it.
- Coffee-to-Water Ratio: Using the correct coffee-to-water ratio ensures optimal extraction. A general guideline is 2 tablespoons of ground coffee per 6 ounces of water.
- Percolator Size: Larger percolators might require a slightly longer percolator coffee camping duration than smaller ones.
Setting Up Your Camping Coffee Percolator
Before diving into the ideal percolating coffee over campfire timing, ensure you have the right equipment and setup.
Required Equipment
- Percolator: Choose a stainless steel or enamel-coated steel percolator that suits your camping needs.
- Coffee Grinder (Optional): Grinding your beans fresh ensures the best flavor.
- Coffee Beans: Select a high-quality coffee bean suited to your taste preferences.
- Water: Use filtered water for the best-tasting coffee.
- Heat Source: Campfire or camp stove.
- Measuring Spoons: For accurate coffee-to-water ratios.
- Heat-Resistant Gloves or Tongs: For handling the hot percolator.
Setting Up Your Percolator
- Grind Your Beans: Grind your coffee beans to a coarse consistency.
- Add Water: Fill the percolator’s bottom chamber with the desired amount of water.
- Add Coffee Grounds: Place the coffee grounds into the filter basket.
- Assemble the Percolator: Ensure all parts are correctly assembled: the basket on top of the stem, and the lid secured.
Perfecting the Percolation Process: Step-by-Step Guide
Now, let’s get to the heart of the matter: how long to percolate coffee on a camp stove or campfire.
Step 1: Heating the Water
Place your assembled percolator on your heat source. If using a campfire, position it carefully to avoid direct flames licking the sides of the percolator. If using a camp stove, set the burner to medium heat.
Step 2: Observing the Percolation
Once the water starts to boil, you’ll see the characteristic “perking” action in the glass knob on the lid. The water will start bubbling up through the tube and filtering through the grounds. This is a visual cue that the brewing process has begun.
Step 3: Adjusting the Heat
Once the perking starts, reduce the heat slightly. The goal is to maintain a gentle, consistent perking action. Too much heat can lead to bitter coffee.
Step 4: Timing is Key
This is where you carefully consider the ideal camping coffee percolator time. Aim for approximately 6-10 minutes of perking time.
Visual Indicators of Brew Strength
- Light Brown Color: Indicates a weaker brew, possibly under-extracted. Consider a longer percolator coffee camping duration in the future.
- Medium Brown Color: Represents a balanced, well-extracted brew. This is the ideal color to aim for.
- Dark Brown/Almost Black Color: Suggests over-extraction, leading to a bitter taste. Reduce the percolating coffee over campfire timing in the next attempt.
Step 5: Removing From Heat
After the desired camping coffee percolation time has elapsed, remove the percolator from the heat source. This stops the brewing process.
Step 6: Letting It Settle
Allow the coffee to settle for a minute or two before serving. This allows any remaining grounds to sink to the bottom, reducing sediment in your cup.
Factors That Influence Percolation Time Outdoors
Getting the percolator coffee camping duration right often depends on recognizing the surrounding elements.
Altitude
At higher altitudes, water boils at a lower temperature. This can affect the extraction rate, potentially requiring a longer percolating coffee over campfire timing.
Temperature
Ambient temperatures, particularly when camping in colder climates, can also impact the brewing time. Colder temperatures might require a slightly longer percolator coffee camping duration.
Heat Source Consistency
Whether you’re using a campfire or a camp stove, consistent heat is essential. Fluctuations in heat can disrupt the brewing process and affect the final taste.
Camping Coffee Percolating Tips for Time Management
Here are some practical camping coffee percolating tips time-related to help you achieve the perfect brew every time:
- Start with a Clean Percolator: Residue from previous brews can affect the flavor.
- Use Filtered Water: Tap water can contain minerals that alter the taste.
- Preheat Your Water: Preheating water in a separate pot can reduce the initial heating time.
- Monitor the Perking: Keep a close eye on the perking action and adjust the heat accordingly.
- Experiment: Don’t be afraid to experiment with different percolator coffee camping durations to find your preferred taste.
- Take Notes: Keep a small notepad and pen to record your brewing parameters (grind size, coffee-to-water ratio, perking time) for future reference.
Common Mistakes to Avoid
Avoiding common pitfalls helps streamline the camping coffee brewing method timing and enhances the end result.
Over-Extraction
Percolating for too long results in a bitter, unpleasant taste. Stick to the recommended time range and monitor the color of the brew.
Under-Extraction
A short percolator coffee camping duration leads to weak, watery coffee. Ensure sufficient brewing time to extract the coffee solids properly.
Using Too Fine a Grind
Fine grounds can clog the filter and lead to over-extraction and a muddy brew. Always opt for a coarse grind when using a percolator.
Neglecting Maintenance
Failure to clean your percolator regularly can lead to the build-up of oils and residue, affecting the taste.
Cleaning and Storing Your Percolator After Use
Proper maintenance extends the lifespan of your percolator and ensures consistently delicious coffee.
Cleaning After Each Use
- Rinse Thoroughly: Immediately after use, rinse all parts of the percolator with hot water.
- Wash with Soap: Use mild dish soap and a soft sponge to remove coffee oils and residue.
- Dry Completely: Ensure all parts are completely dry before reassembling and storing.
Periodic Deep Cleaning
- Vinegar Solution: Soak the percolator in a solution of equal parts water and white vinegar to remove stubborn stains and mineral deposits.
- Baking Soda Paste: Use a paste of baking soda and water to scrub away any remaining residue.
- Rinse and Dry: Thoroughly rinse all parts and allow them to dry completely.
Storing Your Percolator
Store your percolator in a dry, clean place. Avoid storing it with the lid on, as this can trap moisture and lead to corrosion.
Exploring Variations: Adding Flavors and Ingredients
Feel free to add some flair to your camping coffee.
Spices
Add spices like cinnamon, nutmeg, or cardamom to the coffee grounds before brewing for a warm, aromatic twist.
Extracts
A few drops of vanilla or almond extract can enhance the flavor profile of your coffee.
Cream and Sweeteners
Carry powdered creamer or condensed milk for a creamy, rich coffee experience. Honey or maple syrup are natural sweeteners that complement the outdoor setting.
FAQs: Your Burning Questions Answered
Here are some frequently asked questions about how long to percolate coffee camping.
How long to percolate coffee on a camp stove?
Generally, you should percolate coffee on a camp stove for 6-10 minutes.
What is the ideal grind size for percolator coffee camping?
A coarse grind is ideal to prevent clogging and over-extraction.
Can I use pre-ground coffee in a percolator?
Yes, but freshly ground coffee will always yield a better flavor.
What is the best time for camping percolator coffee?
The best time is whenever you need a warm, energizing cup! But many people enjoy it first thing in the morning or as an afternoon pick-me-up.
How do I know when my coffee is done percolating?
Monitor the color through the glass knob. A medium brown color indicates a well-extracted brew.
Can I re-percolate coffee?
It’s not recommended, as it will result in a bitter and unpleasant taste.
Who is the percolator best suited for?
The percolator is best suited for those who enjoy a strong, robust cup of coffee and appreciate a traditional brewing method.
By carefully considering these factors and following the steps outlined above, you can master the art of percolating coffee while camping and enjoy a delicious, revitalizing brew in the great outdoors. Getting the ideal camping coffee percolation time right transforms your coffee from a simple drink to a cherished part of your outdoor experience.

Melody Smith is a passionate writer, outdoor enthusiast, and camping expert based in the Seattle Metropolitan Area. With a deep love for nature and adventure, she shares her personal experiences, tips, and insights on MyCampingPro.com. A seasoned camper and traveler, Melody combines her creative background in design and writing with her love for the great outdoors, offering practical advice and inspiring stories to help others make the most of their outdoor experiences. When she’s not exploring the wilderness, you can find her painting, collecting vintage treasures, or diving into a good book.
