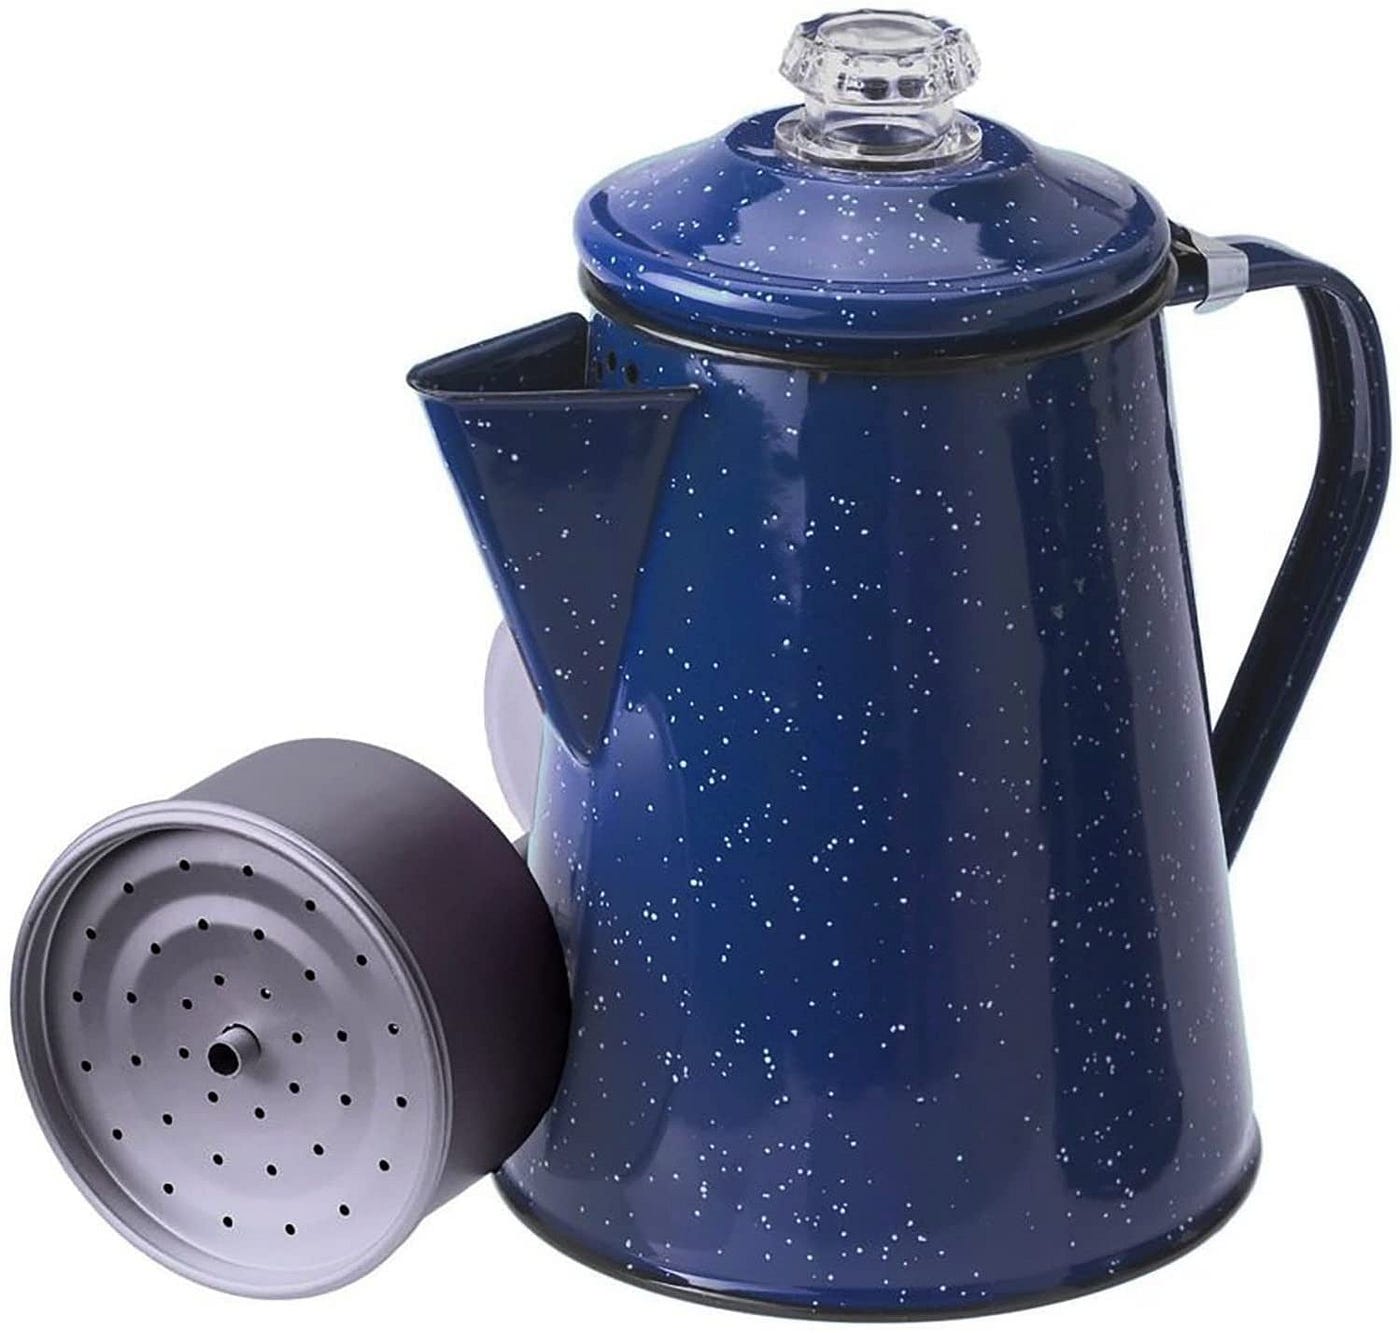
What is a camping percolator? A camping percolator is a coffee pot that brews coffee by repeatedly cycling boiling water through coffee grounds.
Can I use a camping percolator on a campfire? Yes, camping percolators are specifically designed for outdoor use, including over a campfire or on a camp stove.
Who is this guide for? This guide is for anyone looking to brew delicious coffee outdoors using a camping percolator. We’ll explore the best campfire coffee method, providing a comprehensive camping percolator coffee guide, and equip you with camping coffee brewing techniques to master percolator brewing outdoors.

Image Source: miro.medium.com
Choosing Your Camping Percolator
Before diving into the brewing process, let’s talk about choosing the right camping percolator. Several factors come into play, including material, size, and features. Selecting the proper camping coffee equipment is essential for a successful brew.
Material Matters
- Stainless Steel: This is a popular choice because it’s durable, rust-resistant, and relatively lightweight. Stainless steel percolators heat up quickly and are easy to clean.
- Enamelware: Enamel-coated steel percolators offer a classic look and are resistant to chipping and scratching. However, they can be heavier than stainless steel.
- Aluminum: While less common now, aluminum percolators are lightweight and affordable. However, they can react with acidic foods and may not be as durable as other materials.
Size Considerations
The size of your percolator depends on how many people you’ll be brewing for.
| Size (Cups) | Ideal For |
|---|---|
| 4-6 | Solo or couples |
| 8-12 | Small groups |
| 14+ | Large groups |
Key Features
- Heat-Resistant Handle: Essential for safety when handling a hot percolator. Look for handles made of wood, plastic, or heat-resistant materials.
- Glass Knob: The glass knob on top allows you to monitor the brewing process.
- Wide Base: A wide base provides stability, especially when using the percolator on uneven surfaces or over a campfire.
Gathering Your Supplies for Percolator Brewing Outdoors
Here’s what you’ll need for making coffee with a camping percolator:
- Camping Percolator: Your chosen percolator, cleaned and ready to use.
- Coffee Grounds: Choose a coarse grind for percolator brewing (more on this later).
- Water: Filtered water is best for the best-tasting coffee.
- Heat Source: Campfire, camp stove, or portable burner.
- Measuring Cup or Spoon: For accurate coffee-to-water ratios.
- Mug or Cup: For enjoying your freshly brewed coffee.
- Optional: Pot holder or gloves (for handling the hot percolator), spoon for stirring.
Step-by-Step: Percolator Coffee Camping Tips for Brewing
Follow these steps for perfect percolator coffee:
Step 1: Measure Your Water
Add water to the percolator’s body. Most percolators have markings inside to indicate the water level for different cup sizes. As a general rule, use one cup of water per cup of coffee you want to brew.
Step 2: Add Coffee Grounds
Place the coffee grounds into the percolator basket. The general rule of thumb is to use 1-2 tablespoons of coffee per cup of water. Experiment to find your preferred strength.
Step 3: Assemble the Percolator
Place the basket and stem assembly into the percolator. Make sure the basket sits securely on top of the stem.
Step 4: Apply Heat
Place the percolator over your heat source (campfire or stove). If using a campfire, position the percolator carefully to avoid direct flames licking up the sides, which can overheat the handle.
Step 5: Observe the Brewing Process
Watch the glass knob on top of the percolator. You’ll see water bubbling up the stem and dripping over the coffee grounds. This process extracts the flavor from the coffee.
Step 6: Control the Brewing Time
Once the coffee starts perking steadily, reduce the heat slightly. Percolate for 6-10 minutes, depending on your preferred strength. Longer brewing times result in stronger coffee, but be careful not to over-extract, which can lead to a bitter taste.
Step 7: Remove From Heat and Let Settle
Remove the percolator from the heat source. Allow the coffee to settle for a minute or two before serving. This will prevent grounds from ending up in your cup.
Step 8: Remove the Basket
Carefully remove the basket and stem assembly from the percolator. This will prevent the coffee from continuing to brew and becoming bitter.
Step 9: Serve and Enjoy
Pour the coffee into your mug and enjoy your freshly brewed camping percolator coffee!
The Best Coffee for Camping Percolator
The type of coffee you use significantly impacts the taste of your percolator coffee. Here’s what to consider:
Grind Size
A coarse grind is essential for percolator brewing. A finer grind can clog the percolator and lead to over-extraction, resulting in bitter coffee.
Coffee Bean Type
- Arabica: Known for its smooth, aromatic flavor.
- Robusta: Has a bolder, more bitter taste and higher caffeine content.
- Blends: Many coffee brands offer blends that combine Arabica and Robusta beans for a balanced flavor.
Roast Level
- Light Roast: Lighter-bodied with brighter acidity.
- Medium Roast: Balanced flavor with moderate acidity and body.
- Dark Roast: Bold, smoky flavor with less acidity.
Choose a roast level that matches your personal preference. Medium and dark roasts are popular choices for percolator brewing as they hold up well to the brewing process.
Campfire Coffee Method: Tips and Tricks
Brewing coffee over a campfire requires a few extra considerations:
- Flame Control: Use embers rather than direct flames for more consistent heat.
- Percolator Placement: Position the percolator on a stable surface away from excessive heat.
- Handle Protection: Use a pot holder or gloves to protect your hands from the hot handle.
- Wind Protection: If it’s windy, shield the campfire and percolator from the wind to maintain a consistent brewing temperature.
Stovetop Percolator Camping
Using a camp stove for percolator brewing offers more precise temperature control compared to a campfire.
- Choose the Right Burner: Select a burner size that matches the base of your percolator.
- Adjust the Flame: Start with a medium flame and adjust as needed to maintain a steady perking action.
- Monitor the Brewing Process: Keep an eye on the glass knob and adjust the flame as needed to prevent over-extraction.
Percolator Coffee Troubleshooting Camping
Sometimes, things don’t go as planned. Here are some common issues and how to fix them:
| Problem | Possible Cause | Solution |
|---|---|---|
| Weak Coffee | Not enough coffee grounds | Use more coffee grounds per cup of water. |
| Bitter Coffee | Over-extraction (brewing too long) | Reduce the brewing time. |
| Grounds in Coffee | Fine coffee grounds or a damaged percolator | Use a coarser grind, ensure the percolator is assembled correctly, and check for damage to the basket. |
| Percolator Not Perking | Not enough heat or a clogged stem | Increase the heat and ensure the stem is clear of debris. |
| Coffee Boiling Over | Too much heat | Reduce the heat and monitor the brewing process closely. |
| Metallic Taste | New percolator | Brew a batch or two of throw-away coffee to season the percolator. |
| No Coffee Flavor | Old Coffee Ground | Use the best coffee for camping percolator, always choose a fresh ground for the best flavor. |
Caring for Your Camping Percolator
Proper care will extend the life of your camping percolator:
- Cleaning: Wash the percolator thoroughly with soap and water after each use. Use a non-abrasive sponge to avoid scratching the surface.
- Drying: Dry the percolator completely before storing it to prevent rust.
- Storage: Store the percolator in a dry place.
Camping Coffee Brewing Techniques: Beyond the Basics
Want to elevate your camping coffee game? Try these techniques:
- Pre-Wetting the Grounds: Before assembling the percolator, pour a small amount of hot water over the coffee grounds to “bloom” them. This releases CO2 and enhances the flavor.
- Adding Spices: Add a pinch of cinnamon, cardamom, or nutmeg to the coffee grounds for a flavorful twist.
- Using a Coffee Filter: Place a paper coffee filter in the percolator basket to reduce sediment in your coffee.
- Cold Brew Percolator: Use a camping percolator for cold brew coffee, the process is like a regular percolator coffee with regular ground size, but instead of placing it on fire or stovetop, let it soak in room temperature water for a day. This method yields a less bitter coffee due to the extraction process of cold water.
A Comparison of Coffee Making Methods for Camping
Here is a comparison table of camping coffee making methods:
| Method | Pros | Cons | Equipment Required |
|---|---|---|---|
| Percolator | Durable, brews large quantities, no paper filters needed | Can be prone to over-extraction, requires heat source | Percolator |
| French Press | Simple to use, rich flavor | Can be messy, requires hot water | French press |
| Pour-Over | Clean, bright flavor, easily customizable | Requires precise technique, more equipment needed | Pour-over cone, filter, kettle |
| Instant Coffee | Quick and easy | Lacks flavor, not as satisfying as freshly brewed coffee | Instant coffee, hot water |
| Camping Coffee Bags | Convenient, single-serve | Can be expensive, produces more waste | Coffee bags, hot water |
Frequently Asked Questions (FAQ)
Q: How much coffee do I use in a camping percolator?
A: Use 1-2 tablespoons of coffee grounds per cup of water, adjusting to your preferred strength.
Q: What kind of grind is best for a percolator?
A: A coarse grind is best to prevent clogging and over-extraction.
Q: Can I use a camping percolator on an induction cooktop?
A: It depends on the percolator. Check the manufacturer’s instructions to see if it’s induction-compatible.
Q: How long should I percolate coffee on a campfire?
A: Percolate for 6-10 minutes after the water starts perking steadily.
Q: How do I clean my camping percolator?
A: Wash it with soap and water after each use. Use a non-abrasive sponge and dry thoroughly before storing.
Q: What is the best coffee for camping?
A: The best coffee for camping percolator is one of your personal preference, either medium or dark roast and a coarse grind.

Melody Smith is a passionate writer, outdoor enthusiast, and camping expert based in the Seattle Metropolitan Area. With a deep love for nature and adventure, she shares her personal experiences, tips, and insights on MyCampingPro.com. A seasoned camper and traveler, Melody combines her creative background in design and writing with her love for the great outdoors, offering practical advice and inspiring stories to help others make the most of their outdoor experiences. When she’s not exploring the wilderness, you can find her painting, collecting vintage treasures, or diving into a good book.
